Add Custom Fields with Extra User Data
Contents
- What are Custom Fields?
- How to add a Custom Field
- How and why to use Smart Text Fields
- How to Populate the new Custom Field with data
- Use a Custom Field as a Variable
What are Custom Fields?
Custom fields are extra data fields you add to your user data beyond the default user fields used by Dado. These can then be used in different ways to customize dynamic content in experience tasks or messages.
For example, you could create a custom field called "Greeting", and fill it with different words for every user to ensure each employee is greeted in their favorite way.
When you create a new Custom Field, it's set as a new field in every employee's Dado Profile. Saving the data in the Profile allows you to reuse it in Target Audiences or as Text Replacement Variables in Tasks, Messages and Automations. Find instructions for how to do this below, under the heading Use a Custom Field as a Variable.
How to add a Custom Field
- Go to Settings > Data Fields
- Click the Add Field button in the top right of this screen
-
A new window will open in which you can define your custom field.
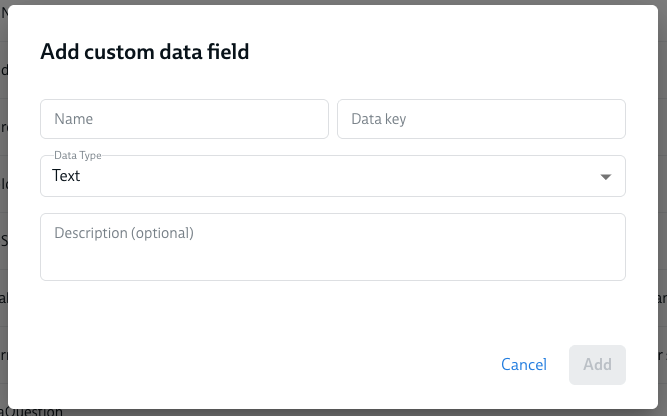
- Start by inputting a Name: this should be something that makes it clear what kind of data will be stored in this field.
- You don't need to specify a Data key – Dado will automatically generate this based on the name.
- Please note that field names need to be unique – you can't input the name of an existing field.
- Then choose a Data Type, based on what kind of information you expect to be stored in this field.

| Field type | Use cases |
|---|---|
| Text |
This is usually the correct choice for any data which isn't a date or user relationship. Even if you want to store a phone number or compensation info, we recommend using Text, because phone numbers can contain dashes and brackets, while comp info often includes currency symbols. |
| Number |
For quantities, IDs, etc. We don't recommend storing phone/house/apartment numbers as Numbers, since these can contain dashes, brackets and letters. |
| Date | For extra dates not supported out of the box by Dado, e.g. Promotion date. |
| Address |
A structured text field for holding address data. To be used with the "Provide Address" subtask type |
| User relationship |
Store the relationship between two users: for instance, someone's skip-level manager, HRBP, or mentor/mentee. If you select this type, you'll need to choose whether the user would be identified by their email address or an ID (eg employee ID) |
| Smart field – date |
A date that's automatically calculated based on another date. For instance "End of Probation" could be calculated to be always 90 days after start-date. |
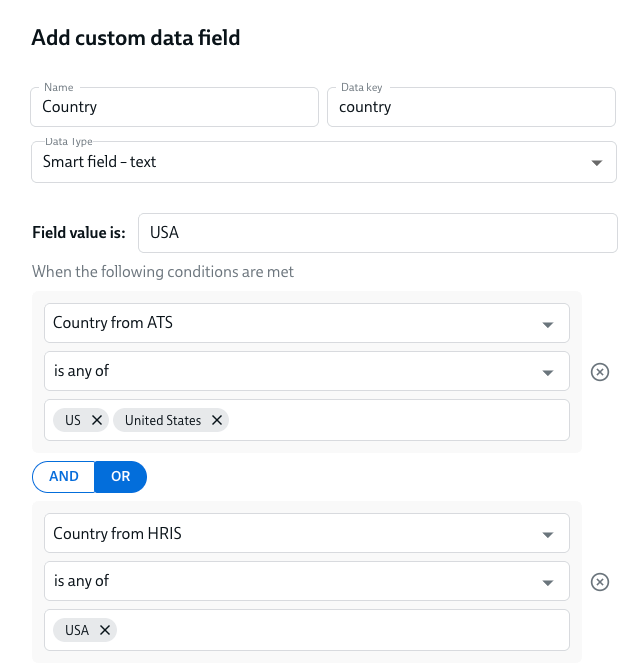
| Smart field – text |
A text field, where you use rules to dynamically set the value, based on other fields. Good for transforming data or grouping states/regions/etc together into larger umbrella groups. |
- Finally, you can optionally set a Description. This can be a useful way to remember what you're using this custom field for; or to communicate that to colleagues also using Dado.
How and why to use Smart Text Fields
Smart Text Fields let you dynamically set the value of the field based on what's in other fields.
To set up these fields, you use the same kind of 'rules' logic you'll be familiar with from Target Audiences. Here's how:
Example use cases for Smart Text Fields
- Identify when new hires are 'cleared to start work' by using one Smart Field to aggregate when they've completed multiple pre-start requirements

-
Group together different states or countries in the regions your organization uses

-
Clean up complex or conflicting data, for instance different location information flowing from your ATS and your HRIS


How to populate the new Custom Field with data
You have several choices of how to populate a new field.
Import data to a Custom Field from an Integration
If you are importing users through CSV, Google Sheet, or Airtable you can link a custom field to a column in your data source. To do so, simply add a column with a name matching the Data Key of a custom field. When you run an import, Dado will bring the data in that column to the appropriate field in each user's profile in Dado.
After adding the column and the data to your CSV/Google Sheet/Airtable table, run a user import to bring the custom data into Dado.
Add data to a Custom Field using a Sub-task
See full instructions in this article: Sending data from a sub-task to a Dado field or other data destination
Use a Custom Field as a Variable
Once you've created a custom field and imported the user data into, it can be used as a Variable. It can be added to the text in Tasks, Automations and Messages using the format {{role.dataKey}}. Note that variables are case sensitive so {{participant.HasPet}} is different than {{participant.haspet}}.
In the the Greeting example above, you could write a message like this:
{{participant.greeting}}, {{participant.firstName}}!
We're happy to have you here! Your manager is {{manager.firstName}}.
If you've added the greeting data "Hello" for a participant called Anna whose manager is Bob, she would see
Aloha, Anna!
We're happy to have you here! Your manager is Bob.
While a participant called Harry, who reports to Ingrid and who has the greeting "Hello" would see
Hello, Harry! <br>We're happy to have you here! Your manager is Ingrid.