Importing users/user data from an Excel Online or Google Sheet
As well as connecting Dado to your HRIS, it's possible to import data about your employees from a Google or Excel Online Sheet.
Regardless of whether you're importing from a spreadsheet or an HRIS, each employee will be created as a Dado user. These users won't have access to the Admin platform that you are using, so they won't be able to edit or view Experiences. Instead, they'll only be able to see the Tasks and Messages assigned to them, in the Experiences they're part of.
Importing your users from Google Sheets/Excel Online can be useful if you already use one of these tools as part of your existing processes; or if you're not yet ready to set up an HRIS integration yet – for instance, if you're still testing out your first Experience with a few users.
Contents
- Setting up a new Google/Excel Online Sheet as an import source
- Setting up an existing Google/Excel Online Sheet as an import source
- Changing what data you import from your Google/Excel Online Sheet
Setting up a new Google/Excel Online Sheet as an import source
If you don't already have a Google/Excel Online Sheet that you use to store employee information, Dado can create one for you. Then you can add and update employee information in this dedicated sheet, and import it into Dado to create and update users.
Before setting this up, you will need to have integrated Dado with your Google/Microsoft workspace. For guidance on how to do this, see these article: Google Workplace Integration; Microsoft Integration.
Here's how to set up your Import Source:
- Go to the Employees tab and click on 'Import Sources' in the left-hand navigation
- Click the 'Add Import Source' button in the top right
- Select Google Workspace or Excel Online from the list of options that appears, and then Create a new import spreadsheet
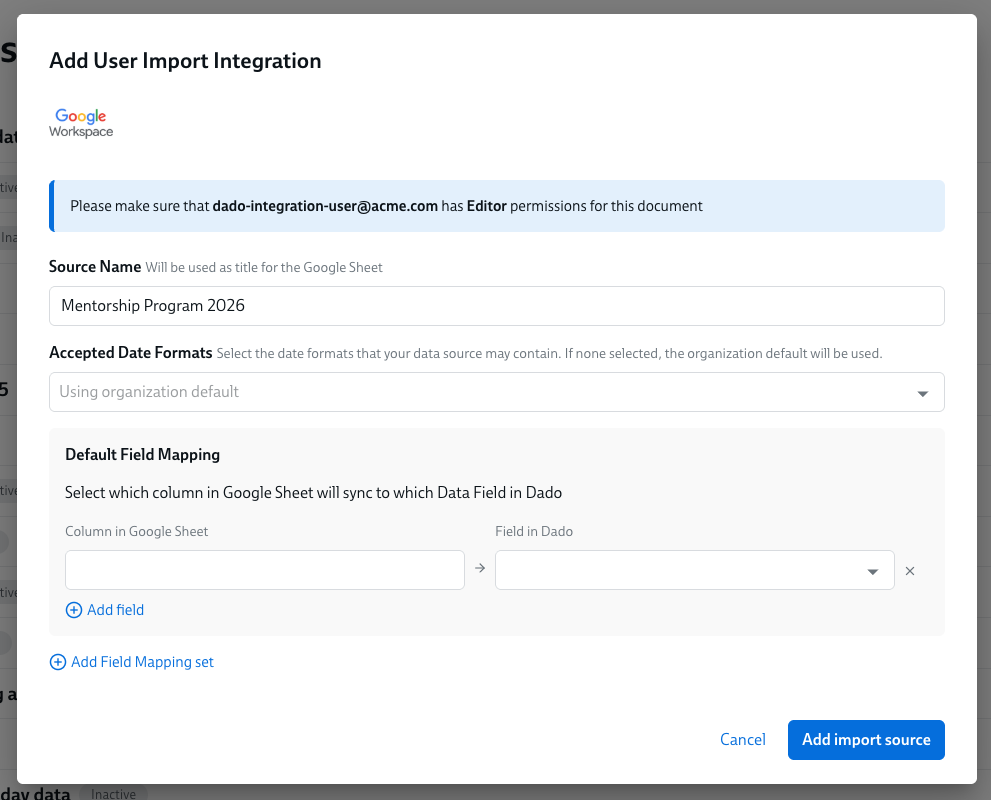
- Now you'll be asked to customize the new sheet. First, give the spreadsheet a name. Aim for something that will make it easy to remember what this spreadsheet is for, when you (or others) see it in your Google/Microsoft workspace.
- Next you have the option to specify the formats that you'll use for dates. In most situations you can leave this option blank
- If this field is left blank, Dado will use the default date format for your organization. You can see this in your Settings page.
- You will need to add in extra date formats if:
- your Google or Excel sheet formats dates differently than you generally do (for instance, you normally write dates MM/DD/YYYY, but this sheet uses YYYY-MM-DD)
- you have dates of birth in your sheet, and they're written without the year – for instance, in MM/DD format
- Below the name field you'll see a list of Field Mappings. This is where you control which data from the spreadsheet will be used to create which Dado fields.
- The fields on the left side show the column titles that your new spreadsheet will contain. Feel free to change these if it will make the spreadsheet easier to understand.
-
The fields on the right side show which Dado field each column is mapped to. Data from that column will be entered in the field it's mapped to.

- By default, this screen shows a mapping for every Dado field. But you can easily amend and delete these mappings.
- You must include at least one email address in your field mappings. Without an email address, Dado will not be able to create new users or update data for existing users.
-
If you won't be getting a particular piece of data from your Import Source, then delete the field mapping for that data point by clicking the 'x' icon on the right of that row.
For instance, if you are collecting any data through Tasks in your Experiences, you should remove those Dado fields from these mappings. Otherwise you run the risk of over-writing your data.

- Once this list of Field Mappings reflects what data you will be entering into your spreadsheet, click Add source.
-
You've successfully created this Import Source, and Dado has created the spreadsheet for you. To go to the Google/Excel Online Sheet, click on the Open Import Source link.

-
If you ever want to change what data gets imported from this spreadsheet (for instance, so you can import more data), click on the name to open up the Field Mapping settings.


After setting up this import source, you'll be ready to run your first import. Find out how in this article
Setting up an existing Google/Excel Online Sheet as an import source
If you already have a Google/Excel Online Sheet that you use to store employee information, Dado can link to this sheet as a data source. Dado will never change any information in this sheet.
Before setting this up, you will need to have integrated Dado with your Google/Microsoft Workspace. For guidance on how to do this, see this article: Google Workplace Integration; Microsoft Integration.
Step 1: Sharing your sheet with the Dado Integration User
- Find out who your integration user is by going to Settings > Integrations, and clicking on the Google or Microsoft card
- The email address shown in this window is the integration user.
- Go to your sheet and share it with this user, granting them edit access.
- Even though the user won't change anything in the sheet, the way the Google/Microsoft APIs work mean that Dado needs the user to have edit access.
Step 2: Setting up your sheet as an import source
- Go to the Employees tab and click on Import Sources in the left-hand navigation
- Click the Add Import Source button in the top right
- Select Google Workspace or Excel Online from the list of options that appears, and then Use an existing spreadsheet
- You will now be asked to input the URL of your existing Google/Excel Online Sheet
- Go to your spreadsheet and open the tab you want to use as a data source.
- Copy the URL from the URL bar, and paste this into the field on this Dado screen.
- Click 'Verify file access'
- If you have not shared the sheet with the Dado Integration user (see previous step) you will see an error here
-
A new screen will appear, in which you can specify what should be imported from this sheet.
- First, you have the option to specify the formats that you'll use for dates. In most situations you can leave this option blank
- If this field is left blank, Dado will use the default date format for your organization. You can see this in your Settings page.
- You will need to add in extra date formats if:
- your Google or Excel sheet formats dates differently than you generally do (for instance, you normally write dates MM/DD/YYYY, but this sheet uses YYYY-MM-DD)
- you have dates of birth in your sheet, and they're written without the year – for instance, in MM/DD format
- Next you can specify what data should be imported from this spreadsheet, using Field Mappings.
- In the fields on the left side, fill in the names of the Google/Excel Online Sheet columns you'd like to sync to Dado.
- It's very important these match exactly, so we recommend copy-pasting them from the sheet.
- The fields on the right side show which Dado field each column is mapped to. Data from that spreadsheet column will be entered in the field it's mapped to.
-
You may need to create new custom fields in Dado to store this data.

-
- You must include in your field mappings either an email address or a system ID that Dado already has access to (eg your HRIS ID for each employee). Without either of these, Dado will not be able to create new users or update data for existing users.
- If you change your mind about a particular field mapping, you can delete it by clicking the 'x' icon on the right of that row
- In the fields on the left side, fill in the names of the Google/Excel Online Sheet columns you'd like to sync to Dado.
- Once this list of Field Mappings reflects what data you want to import from your spreadsheet, click Add Import Source.
-
You've successfully created this Import Source. You can easily go to the Google/Excel Online Sheet at any time, by clicking on the Open Import Source link.
-
If you ever want to change what data gets imported from this spreadsheet (for instance, so you can import more data), click on the name to open up the Field Mapping settings.


After setting up this import source, you'll be ready to run your first import. Find out how in this article
Changing what data you import from your Google/Excel Online Sheet
If you'd like to import extra data from your sheet, or stop importing a particular datapoint, you can simply update the Field Mappings.
- Go to Employees > Import sources, and click on the sheet you'd like to change. This will open up the list of field mappings.
- To import new data from the sheet, add a new field mapping:
- Add a column to your sheet and give it a unique title in the first row
-
Click Add field

- In the first box, put the name of the new column in your sheet
- In the second box, choose the Dado field you'd like to store this data
- You may need to create a new custom field
- Click the blue Save Changes button on the right of the screen
- To stop importing one column, remove the relevant field mapping
-
Click the little x at the right of the relevant row in the field mappings to remove that column

-


- Click the blue Save Changes button on the right of the screen