
The Enroll in Course Subtask and Automation
Dado can connect to your Learning Management System (LMS) to automate employee course enrollment. Once your LMS is connected, you can use two different tools depending on what you need:
- an Automation to simply enroll someone in a course
- a Subtask that both enrolls someone and automatically completes when they’ve finished the course in your LMS (i.e. they don’t need to confirm in Dado that they’re done)
Contents
Pre-requisites
An active integration between Dado and your LMS
Connecting an LMS to Dado is itself a two-step process: linking your LMS account to Dado, then setting up a webhook so your LMS can tell Dado when a course has been completed. That setup is covered in your LMS's own integration article (for example, the Docebo Integration article). This article assumes that step is already done.
Users must already exist in your LMS
Dado does not create users in your LMS. For Dado to enroll someone in a course, they must already have an account there. If they don't, you'll see an error on the Automation or Task log instead of a successful enrollment.
Automation: Enroll in course
Use the Enroll in Course automation action when you simply want to enroll someone in a course automatically, without tracking whether they go on to finish it.
How to set up the Enroll in course automation
-
Add an Automation to your Timeline, then click the Enroll in Course action in the left hand column
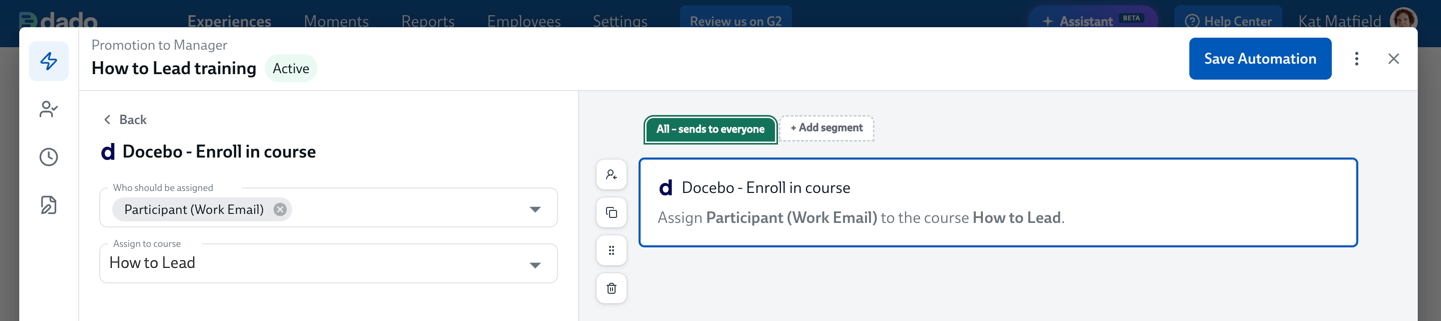
- Choose the course you want to enroll people into, from the courses in your LMS made accessible to Dado
- If you can’t see the course you want, confirm that the Dado ISU has access to this course in your LMS.
- Choose who should be enrolled. By default this is the Participant, but you can select any Supporting Actor role you've set up in your Experience.
- If you only want this automation to run for some people in this experience, use a Target Audience.
- Click Save Automation or Add automation.
- Save your overall Experience
If the person being enrolled doesn't already have an account in your LMS, the enrollment will fail, flagging that the issue is a missing LMS user account.
Subtask: Complete LMS Module
With the Complete LMS Module Subtask, Dado will enroll the employee into the relevant course, and then the Dado Subtask will monitor the course status, automatically completing itself once the course is completed in the LMS.
How the Complete LMS Module subtask works
The Complete LMS Module sub-task is only available for LMS platforms that can sync course completion data back to Dado. Not every LMS supports this. The Enroll in Course automation above doesn't have this requirement, and will be available for every LMS Dado integrates with.
- When the Task containing this Subtask starts, Dado enrolls the assignee in the course you've chosen.
- The assignee completes the course in your LMS.
- Your LMS syncs the completion back to Dado, usually within about 30 minutes.
- The Subtask automatically completes.
- If this is the only Subtask in this task, the Task will also automatically complete, triggered any Timeline Items set to start at this point.
If the person being enrolled doesn't already have an account in your LMS, an error will be shown for this Subtask, flagging the missing LMS user account.
How to set up a Complete LMS Module sub-task
-
Add a Task, then click to add a Complete LMS Module subtask.
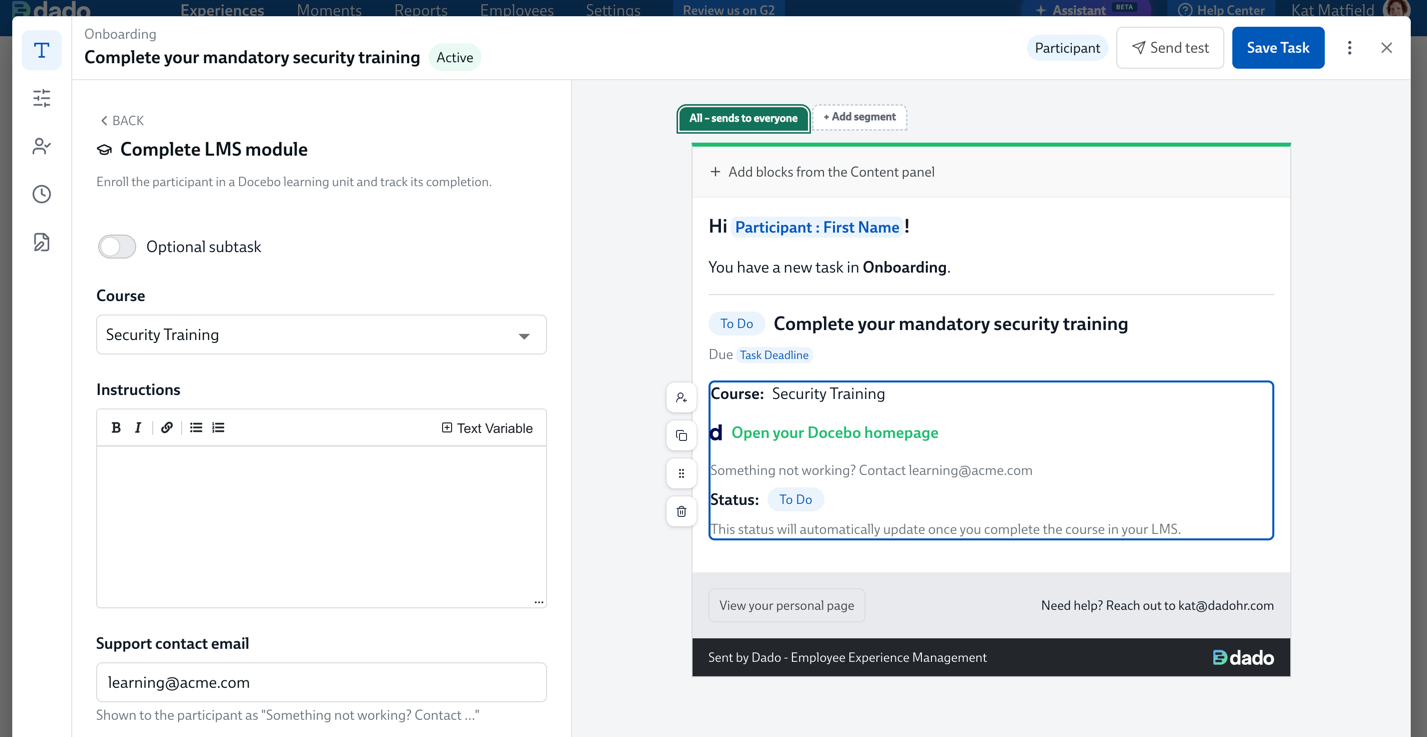
- Choose the course you want to enroll the assignee into.
- If you can’t see the course you want, confirm that the Dado ISU has access to this course in your LMS.
- Optionally, add instructions. This is a good place to add context for why the course matters, or to reinforce a deadline.
- Add a support contact email. This field is required.
- Your LMS is usually managed by a different team than the one running this Experience. If an assignee has trouble accessing the course, or something looks wrong on the LMS side, they need someone from that team to ask.
- If you only want this automation to run for some people in this experience, use a Target Audience.
- Click Save Task or Add Task in the top right of the window.
- Save your overall Experience
