The Complete Background Check sub-task
The Complete Background Check sub-task enables Dado to automatically initiate a background check in your background check provider's platform, and auto-completes when the assignee has provided the necessary information. The status of this background check (and any sub-checks) will be synced to the Dado platform and stored on the user profile, as well as synced out to other systems.
Contents
Pre-requisites for using this Sub-task type
- An account with a background check provider
- An integration between the background check and Dado
- Find instructions on integrating Checkr here. For other providers, please contact our help@dadohr.com
How to set up a Complete Background Check sub-task
Step 1: Add a Task and a Complete Background Check sub-task
- Get started by creating a Task, and then dragging the Complete Background Check Sub-task into the center section. This will open up the Sub-task settings in the right section

- Start by setting the Link text. This is what will appear in the sub-task shown to the assignee, as a link to the location on the background check platform where they can provide the necessary information for their check.
- In the screenshot above, the default value is shown ("Complete your check here"). You can change this by entering something else into the Link text field
- Then select the package in the dropdown
- If your platform uses nodes or sub-accounts, you will need to select this first, and then you will be presented with a list of different packages within that node/sub-account.
If you want different background check packages to be initiated for different types of worker (for instance, employees versus contractors), then add multiple Complete Background Check sub-tasks, then use Target Audiences to determine which sub-task goes to which audience.
Step 2: Configure the Data Destinations for the package results
Dado can store the outcome of the overall package and/or sub-checks on a user's profile in Dado, and sync this data out to external systems that you've connected to your Dado organization (such as your HRIS, or Google/Excel sheets).
- In the right hand column, select Add Destination

- Select the result type you'd like to store in the first dropdown
- By default, the result for the overall package, the status for the overall package. and the result of any sub-checks are shown here
-
If you would like additional data about the background check to flow into Dado, please contact your Dado Customer Success Manager to discuss.
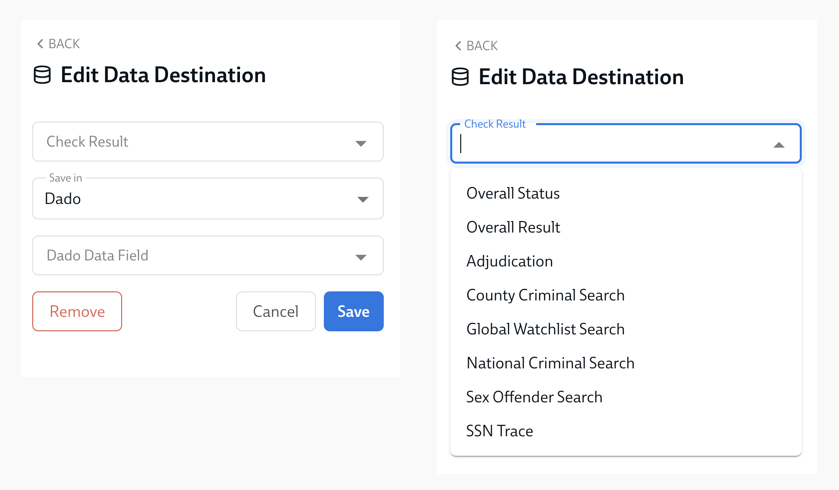
- In the second dropdown, select the system where you'd like this data stored. For instance: Dado, your HRIS, Google Sheets, Excel Sheets, and so on
- In the third dropdown, select the field or column in that external source where the data should be stored.
- Once you've filled all three dropdowns, click Save
- Repeat this process for every datapoint from the background check you'd like to be stored.

Step 3: Save your Task and your Experience
- Once you've set up the subtask and the Data Destinations as described in steps 1 and 2, save the task by clicking Save or Add in the top right
- Then, once you've completed any other changes you want to make to this Experience, click Save changes in the bottom right.