5 minute introduction to Dado
Welcome to Dado. Dado is an employee experience platform that lets you automate key employee experiences to reduce manual effort and improve employee engagement and retention.
In this quick-start guide, we'll cover the key concepts you'll need, to understand Dado:
- Experiences
- The key components of an Experience
- The Timeline
- Selecting Participants and Supporting Actors for an Experience
- What Participants and Supporting Actors see
- Users and user data
- Integrations
Experiences
At the heart of Dado are the Experiences you create. Each Experience is a collection of Tasks, Messages and Automations scheduled along a timeline. Participants selected by you will automatically progress along the timeline, receiving Messages and completing Tasks as they go.
Any kind of Experience can be set up in Dado, including onboarding new employees, offboarding leavers, celebrating employee anniversaries, and running training programs.

The key components of an Experience
Experiences are made up of a sequence of fully customizable Messages, Tasks and Automations; and the different Roles who will receive Messages and complete Tasks.
Messages are custom emails or instant messages, that can be personalized to each person going through the Experience. You control the content, the channel, and exactly who receives them at which moment. Messages require no action from the recipient.

Tasks are actions that must be taken by a specific person involved in this Experience. A Task always has a deadline, completion criteria and a status (Pending, Started, Done or Late). You can choose from a range of Task types from providing information to watching videos, to arranging meetings.

Automations are actions that are performed by systems or integrations, without needing any manual effort by anyone. For instance, you can use automations to add a new employee to a calendar event or a Slack channel; or create a ticket in your task management system.

Roles are the people involved in the Experience.
- Every Experience must have a Participant, the person the Experience is centered around. For instance, in an onboarding Experience, the new employee is the Participant.
- You can also add as many Supporting Actors as you wish to the Experience. These can be groups of people (eg your IT team) or a single person (eg a new employee’s manager).
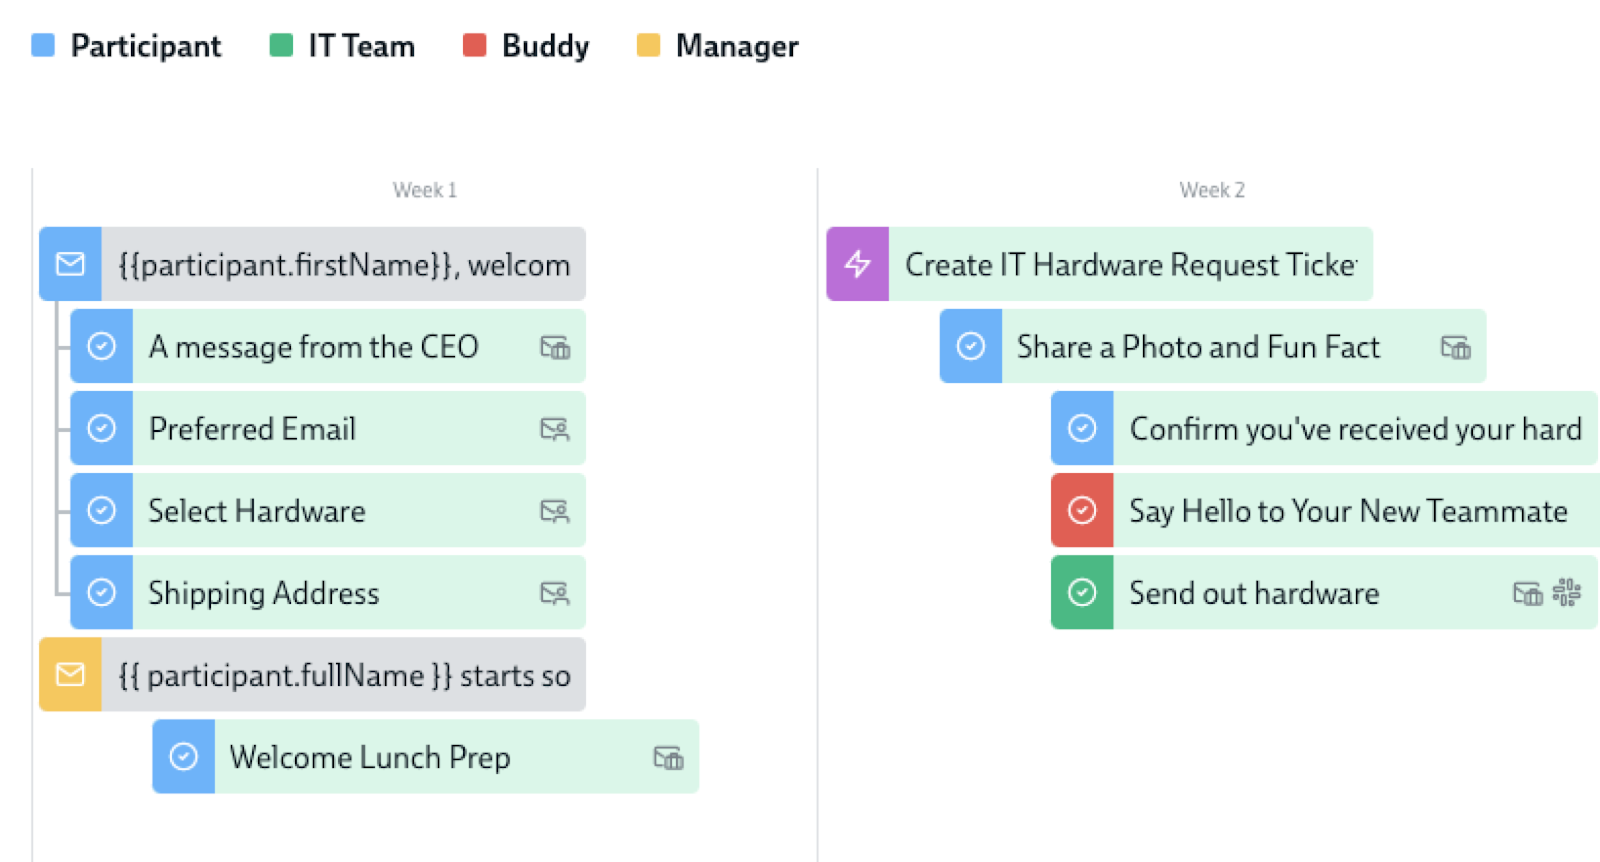
The Timeline

All the Messages, Tasks and Automations you create as part of an Experience are placed on a Timeline, to determine when they’re triggered. The Timeline is based on relative dates, which is why you’ll see ‘Week 1’ and ‘Week 2’ rather than calendar dates.

When creating an Experience you can specify what these dates relate to. For instance, the Experience above is anchored on the new employee’s start date. Every Message, Task and Automation is triggered a specific number of days before or after that start date. This relative date system enables you to create a single Experience, and re-use it multiple times over months or years, for different cohorts of employees.
Alternatively, you can schedule Experiences to start on a particular calendar date, or as soon as you enroll a Participant.
Each item on the Timeline is color-coded, so it’s easy to see which Role will receive the Task/Message. Automations that will execute without manual effort are colored purple.
Selecting Participants and Supporting Actors for an Experience
You have different ways to control who becomes a Participant in each Experience.
The Participant (the person an Experience centers around) can be enrolled in an Experience manually, or you can set up filters to determine who is automatically enrolled. For instance, in this onboarding Experience, any employee with a start date after June 1st is automatically enrolled.

Supporting Actors for each Experience can be selected based on different criteria:
- A consistent person or group for every Participant: for instance, your IT team or the HR point of contact for this Experience
- A different person for different Participants: for instance, the Participant’s manager, or the relevant HR business partner for the Participant’s department
What Participants and Supporting Actors see
As well as receiving emails and instant messages, Participants and Supporting Actors all have access to a personalized view. Here they can see all the Messages and Tasks they’ve received, and get a preview of what Tasks are upcoming. It’s easy for them to check what still needs to be done, and what they’ve already completed.
You can preview what the Participant or any Supporting Actor will see from the Experience page.
Users and user data
Dado stores a limited amount of data about the members of your organization, to enable it to send the right Messages and Tasks to the right individuals. Everyone who is a Participant in an experience must first be added as a User to Dado (either manually or through an automated import).
Data about these users can be found in the Users tab. This data is imported into Dado’s systems either manually (eg from Google Sheets or Airtable) or through a connection to your HRIS or ATS. You have complete control over which datapoints are imported into Dado, whichever source or import method you choose.
Integrations
When you connect Dado to the other tools and software your organization uses, you reduce repetitive manual tasks and provide a more cohesive experience for employees.
A range of different integrations are possible:
- HRIS and ATS: channel the necessary data about employees and new hires into Dado, to trigger customized Experiences at the right moment with no manual effort
- Other data sources and destinations: Google Sheets and Airtable integrations provide maximum flexibility for getting data into Dado and giving other teams access to structured data collected through Dado
- Communication channels: whether your organization lives and breathes Slack, Teams, email or something else, choose the best channel for Messages and Task to reach Participants and Supporting Actors
- Automation and Task integrations: connect up your task management software to automatically create tickets for your facilities team; or your swag provider so new hires can easily arrange for their choice of swag to be delivered

Learn more
To dive deeper into Dado’s functionality, check out our help documentation on